Just a note to say that this blog has merged with the main blog. I am not able to post enough content to have the 2 blogs so for ease merged them so that the "workshop" posts provide a bit more content on the main one. I'll probably leave this for now to redirect so all posts will appear at:
Saturday, 6 March 2021

Sunday, 22 March 2020
Hand Painting Shield Designs
This post is a companion to this main post on Antiochus IV's Romanised infantry which was inspired by Angus McBride's plate in Monvet's Seleucid Army book which was also faithfully reproduced by Angel García Pinto for Ancient Warfare magazine. The distinctive shield device was the main feature I wanted to replicate and this post is to expand on how I did this.


The process to achieve the design was quite experimental not having much experience with free hand designs. Starting with the red basecoat (step 1) was the diamond shape (step 2) after haphazardly painting wobbly diamonds I broke the process down to slightly more consistent manner;
A) Along both sides of the the spine of the shield paint the height of the shape.
B) From the centre of the shield boss paint a line for the width of the shape.
C) Connect the top and bottom of the shape to the width lines.
D) Fill in the centre.
 |
| The "diamond" shape break down |
Quite hard to see the detail on the picture:
Step 1) Red basecoat.
Step 2) Turquoise diamond background.
Step 3) Edges and spine painted in bronze and also within the diamond rough wing shapes.
Step 4) The centre of the boss in dark grey for the face.
Step 5) In the dark grey area a rough face shape; a line in the middle for the nose, dots either side of that cheeks, horizontal lines below for the mouth and most of the area above the nose for the forehead.
Step 5) In the dark grey area a rough face shape; a line in the middle for the nose, dots either side of that cheeks, horizontal lines below for the mouth and most of the area above the nose for the forehead.
Step 6) Highlight step 5 with white
Step 7) Highlight around the face and the wings with old gold (spine optional).
Step 8) Highlight the diamond with blue green to give wreath\leafy effect.
 |
| Step by step |
 |
| Finished examples with the red highlighted |
 |
Tuesday, 25 February 2020
Newline Comparison

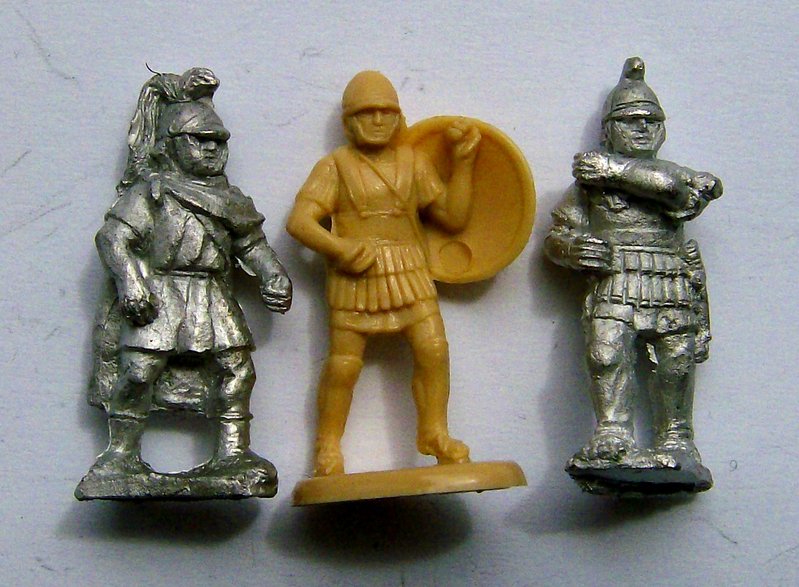
As I chip away at two units of Newline Designs 20mm Imitation Legionaries I had some Hat Hannibal's Veterans and a Zvezda figure from the Macedonian pike set in 1/72.
Waiting for some bits to dry I set up an impromptu comparison picture which might be helpful to some.
Tuesday, 1 October 2019
Persian Slingers Comparison
Just a few comparison pics of Hat's 1/72 Persian slingers and Newline Designs 20mm Persian Slingers. I'll let the pictures speak for themselves:


Tuesday, 25 June 2019
Painting Thureophoroi
I had fell out of the habit of writing down my method of painting but as it will become clear below its useful having a recipe book. Mainly in my case I got mixed up with the order of steps so when I paint more in the future I can finally learn from my mistakes. If it is helpful to anyone else out there then that's even better.
My basic goal is to paint units, lots of figures at once, so I aim for a balance between quantity and quality. With that in mind I essentially use an 'Army Painter' method of basecoat wash and little bit of highlighting if neccessary.
I undercoated these with artists acrylic guesso procured from the Works, if I was starting a whole unit I might have used a Army Painter Barbarian Flesh. The guesso however provides a great key for paint to be applied.


I usually try to start with the deepest parts of the miniature. I Started with their cloaks because from the front the cloak is in the nooks and crannies using Games Workshop Citadel (GW) foundation Tausept Ochre.


GW Tallarn Flesh for the skin including the face and helmet. I have found that this paint provides a nice base to paint Vallejo (VJ) Metallic brass. Once done I went over the boots with GW Graveyard Earth. Newer sculpts of this code have facial hair which were painted GW Scorched Brown.


Then the tunics, however in retrospect, I would do this step BEFORE painting the flesh. I think this is how I originally painted them years ago. It would have made the process easier.
One unit was based with GW Shadow Grey and the other with GW Scorched Brown then a stripe was painted down the front using GW Deneb Stone.
I left the straps, the shield will cover them up and the Scorched Brown base is a suitable colour for the rest. I used the brown to also paint the beards which the newer of the sculpts appear to sport.


The helmet was painted next with Vallejo Brass, the plume black and spear GW Vomit Brown. The spear is washed with GW Ogryn Flesh wash. A final inspection and cleanup of any mistakes.


GW Delvan mud wash was then applied shading the figures in a quick and easy manner. It also helps I find to hide slight mistakes and wobbly painting between different coloured areas such as the cloak and tunic.


Following the wash highlighting begins. Starting with the nose, cheeks and chin with GW Elf flesh. Beards were highlighted with a lighter Brown. Then the helmet is highlighted with Vj Old Gold.
Tunics highlighting is next. The brown tunics were first highlighted with GW Beastial Brown and further highlight with GW Vermin Brown. The stripe painted GW Deneb Stone followed by VJ Off White.
The grey blue tunics were given GW Shadow Grey and a further highlight of the same colour lightened with a touch of VJ Off White.
Both then had their cloaks highlighted in the original colour, GW Tausept Ochre. Spear tips were painted in GW Chainmail and the butts VJ Brass. The main body if the figures were finished off with the base painted with some OOP (like most of my paints) wilkos tester pot coffee paint.


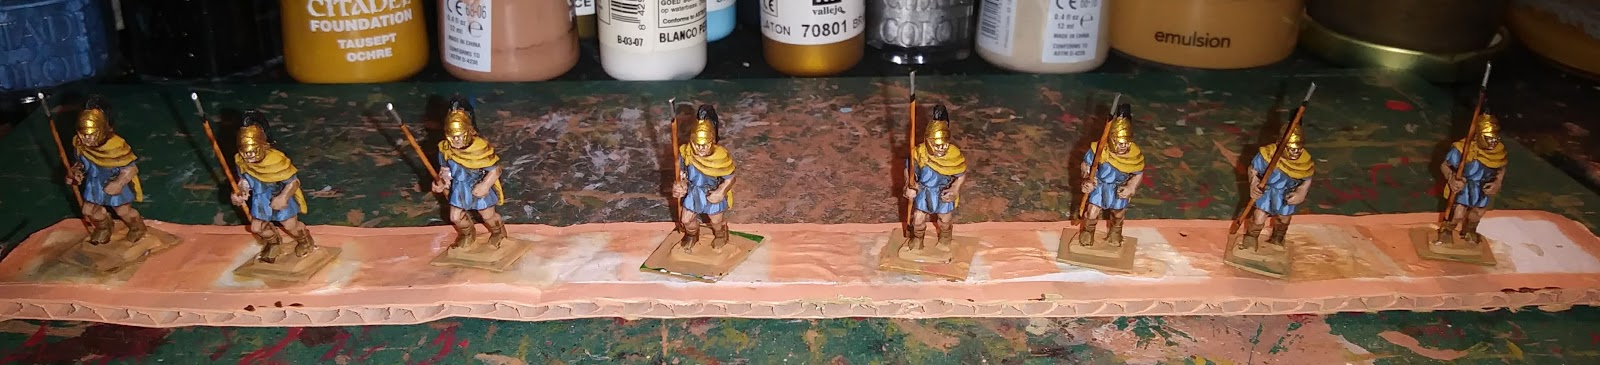

Next up is their shields. The backs if them were undercoated with gesso followed by a GW Deneb Stone base coat.
The shields were then glued to the figures and the same process are applied to the fronts. The shield fronts is then dry brushed VJ Off White. The boss is painted VJ Bronze with a VJ Brass highlight. After that they are ready for the basing room!


As a final note I again was happy with the guesso undercoat. It made the basecoating process quite easy. I had to water down the paint a bit, aided by my new wet palette, as the guesso appears to absorb the paint nicely. So unless there is a major benefit to spray under/base coat I will stick with the guesso. The crisp detail of the Newline Design figures work very well with a basecoat, wash & highlight Army painter inspired method.
Sunday, 2 June 2019
Painting Triarii
I started this guide some time ago and its long over due. I have realised that I have a few part done painting guides on the blogs drafts list! I am not sure if it is complete but I think its about there.
Army Painter Black spray undercoat
Dry brush Chainmail GW Chainmail
Paint legs, arms and head GW Tallarn Flesh
Paint sandles and greave straps GW Calthan Brown
Paint Greaves, helmet VJ Brass
Basecoat Tunics GW Terracotta, Shadow Grey, Fortress Grey
Paint Belts, scabbards Dark Brown
Paint edging of chainmail and highlight belts GW Vermin Brown
Dry brush Scabbards GW Snakebite Leather
Paint Spearshafts GW Vomit Brown
Paint hair
Paint plumes Black
GW Flesh wash on Spearshafts
GW Mud Wash avoiding chainmail areas
Highlight faces in GW Elf flesh
Highlight Bronze armour in VJ Old Gold
Highlight Tunics Red, Space wolves Grey, white
Paint shield backs base colour glue on to figure.
Paint shield front base colour.
Wash or Dry brush
Paint top and bottom edge brass, highlight old gold.
Paint shield boss gun metal highlight with chainmail.

Army Painter Black spray undercoat
Dry brush Chainmail GW Chainmail
Paint legs, arms and head GW Tallarn Flesh
Paint sandles and greave straps GW Calthan Brown
Paint Greaves, helmet VJ Brass
Basecoat Tunics GW Terracotta, Shadow Grey, Fortress Grey
Paint Belts, scabbards Dark Brown
Paint edging of chainmail and highlight belts GW Vermin Brown
Dry brush Scabbards GW Snakebite Leather
Paint Spearshafts GW Vomit Brown
Paint hair
Paint plumes Black
GW Flesh wash on Spearshafts
GW Mud Wash avoiding chainmail areas
Highlight faces in GW Elf flesh
Highlight Bronze armour in VJ Old Gold
Highlight Tunics Red, Space wolves Grey, white
Paint shield backs base colour glue on to figure.
Paint shield front base colour.
Wash or Dry brush
Paint top and bottom edge brass, highlight old gold.
Paint shield boss gun metal highlight with chainmail.
Monday, 9 July 2018
The To-do List.
Welcome to the workshop. Just a side blog to keep my main blog 'tidy' with WIP info, painting guides and unpainted miniatures reviews and comparisons.
MAGNESIA, 190 BC
- 1 Pergamene and Achaean,*
- 1 Macedonian and Thracian,*
Could use finished Thureophoroi or paint some new units.
AL + VHC (Eumenes’ Pergamenes)
- using Maccabean Cavalry.
Seleucids:
2 LHI
-1 Cappadocian and Mercenary*
-1 Galatian and Asiatic, using Armoured Thracians
1 LCA (Settler),
Using Seleucid Companions for these
* Could easily use finished Thureophoroi units!
Updated 10/9/20
I have chopped and changed my plans more than I can remember. Whether it has been because of basing or ruleset preferences or just an expansion of how many figures I want in the units, I am forever dredging through my boxes of figures trying to remember why I bought this set or that set. I am planning on using this workshop blog to plan my future projects and have to-do lists to help me remember and keep me on track of what's going on.
Currently the focus is on Lost Battles and To The Strongest!
After a slump with painting and general unsatifaction in my original format I decided rebase my ancients armies. I also invested in a gaming cloth and there is a secondary goal of matching the colours of that.
Units will be based on an 80mm frontage. 12 heavy foot 2 ranks of 6, 6 for lights. For horse 4 riders per base and 2 for lights. Still deciding in vehicles and elephants but the current 40mm frontage of my elephants might be fine depending on what is needed for scenarios.
The list below is what is left to do for the battles and will be deleted when completed and hopefully photographed and posted on the main blog. For reasons mentioned above some units will end up being proxied and not neccesarily the 'nationality' mentioned in brackets.
Key:
Planned
Planned
In progress
MAGNESIA, 190 BC
Romans:
2 AHI- 1 Pergamene and Achaean,*
- 1 Macedonian and Thracian,*
Could use finished Thureophoroi or paint some new units.
AL + VHC (Eumenes’ Pergamenes)
- using Maccabean Cavalry.
Seleucids:
2 LHI
-1 Cappadocian and Mercenary*
-1 Galatian and Asiatic, using Armoured Thracians
1 LCA (Settler),
Using Seleucid Companions for these
* Could easily use finished Thureophoroi units!
Updated 10/9/20
Newline Designs 20mm Carthaginian African Pikemen
A few old scans of Newline Designs 20mm Ancient Carthaginian African Pikemen codes. Originally posted on the 1/72 Ancients yahoo group. They may not be much use as listed because the idea of Carthage fighting in the Macedonian manner has fallen out a favour some time ago now. I think this was due to misunderstanding over the translation of "Longchephoroi" which was translated as a pike bearer in earlier versions I believe. However the longche is currently believed to be a light spear or javelin.
However these are great miniatures to use as Hellenistic Successor pikemen if paired with ANM01 Macedonian foot command figures. They could also be mixed along with the Macedonian pikemen (ANM02-04) to give a nice variety of helmet types, especially with the addition of the masked helmeted 2nd ranker (ANM03a). I am hoping to do that for a unit of 48 mixed pikemen for a "citizen" phalanx for the likes of the Achaean League for example.
I am also hoping to use the 2nd and some 1st rank figures as spearmen with larger Agrive type shields. The larger shield should cover the left open hand whilst the thin bristles I use for spears should be able to be angled away from the larger shield. Hopefully they would then have an appearance akin to a hoplite. The only issue would be the extra strap moulded on, but it'll not be too much of a problem to me. Initial experiments have convinced me this is doable. Anyway to the scans.
These are currently unlisted, African veteran pikemen in chainmail, front rank and pike upright pose:

They are reminiscent of the Hellenistic pikement illustration featured in Peter Connolly's Greece and Rome at War:

African pikemen ANA02 Front rank, ANA03 2nd Rank & ANA04 Rear ranks which have a few conical helmets which could be fashioned into the simple pilos helmet potentially:

My Seleucid Phalanx using "African pikemen", half the ANA02 figures and ANA03 codes:


As ideas change and some fall out of favour and others rise into prominence some figures will become defunct however there could be ways to give them a new function or lease of life. A bit of re-branding or renaming could make this line more relevant to current trends for example; ANM## Successor pikemen. Ultimately I am very pleased that these figures are available whatever their designation as I have stockpiled quite a lot of them because of their usefulness.
Tuesday, 17 October 2017
Silvershields Paint guide
Just a modified version of the Hellenistic rank and file painting guide
Base/undercoat: Army Painter white spray paint
Base colours
Flesh: GW Tallarn Flesh
Tunics: VJ Royal Purple (thinned down a bit over the white gave them a bit of shading also)
Straps, scabard & sarissa: dark brown
Helmet & greaves: GW Boltgun Metal
Sandles: mid/light brown
Washes:
Linothorax: watered down GW Mud wash over the white undercoat
Everywhere else: GW Mud wash
Highlights
Face: GW Elf Flesh
Tunics: VJ Royal Purple (skipped this on the second batch) followed by VJ Purple
Straps & scabards: GW Vermin Brown
Sarissa: GW Snakebite Leather in thin varied length lines
Helmet & greaves: GW Chainmail
Sarissa and Shield
Tip and butt: Black basecoat, GW Chainmail for tip and VJ Brass for butt
Back of push pin shield: GW Vermin Brown

Base colours
Flesh: GW Tallarn Flesh
Tunics: VJ Royal Purple (thinned down a bit over the white gave them a bit of shading also)
Straps, scabard & sarissa: dark brown
Helmet & greaves: GW Boltgun Metal
Sandles: mid/light brown
Washes:
Linothorax: watered down GW Mud wash over the white undercoat
Everywhere else: GW Mud wash
Highlights
Face: GW Elf Flesh
Tunics: VJ Royal Purple (skipped this on the second batch) followed by VJ Purple
Straps & scabards: GW Vermin Brown
Sarissa: GW Snakebite Leather in thin varied length lines
Helmet & greaves: GW Chainmail
Sarissa and Shield
Tip and butt: Black basecoat, GW Chainmail for tip and VJ Brass for butt
Back of push pin shield: GW Vermin Brown

Monday, 25 September 2017
Painting Marian Roman Legionaries
After painting a few Marian Romans I thought I write down the process to refer back to since it will probably be a while before I paint more of them.
Undercoat Black
Dry/overbrush Armour, Pilum & Sword: Boltgun Metal
Head arms Legs: Tallarn Flesh
Helmet: Boltgun Metal or Brass
Belt, Scabbard, Pilum shaft: Dark Brown
Sword Hilt scabbard edges: Brass
Tunic: Light grey or Terracotta
Sandles: Snakebite Leather
Crest: Black
Head, arms & legs: Delvan mud wash
Highlight Face: Elf Flesh
Highlight Helmet: Chainmail or Old Gold
Highlight Pilum & Sword: Chainmail
Highlight Sword Hilt scabbard edges: Old Gold
Highlight Belt, Scabbard, Shoulder armour edges: Vermin Brown
Highlight Tunic: White or Red
Highlight Pilum shaft: Snakebite Leather

Shield: Medium Blue or Red
Wash: Blue wash or Red wash
Highlight Spine, edge Medium Blue or Red
Shield boss: Boltgun metal; highlight: Chainmail

Undercoat Black
Dry/overbrush Armour, Pilum & Sword: Boltgun Metal
Head arms Legs: Tallarn Flesh
Helmet: Boltgun Metal or Brass
Belt, Scabbard, Pilum shaft: Dark Brown
Sword Hilt scabbard edges: Brass
Tunic: Light grey or Terracotta
Sandles: Snakebite Leather
Crest: Black
Head, arms & legs: Delvan mud wash
Highlight Face: Elf Flesh
Highlight Helmet: Chainmail or Old Gold
Highlight Pilum & Sword: Chainmail
Highlight Sword Hilt scabbard edges: Old Gold
Highlight Belt, Scabbard, Shoulder armour edges: Vermin Brown
Highlight Tunic: White or Red
Highlight Pilum shaft: Snakebite Leather

Shield: Medium Blue or Red
Wash: Blue wash or Red wash
Highlight Spine, edge Medium Blue or Red
Shield boss: Boltgun metal; highlight: Chainmail

Tuesday, 29 August 2017
Painting Hellenistic Pikemen Rank and File
Just a quick painting guide for my Seleucid Phalangites. I try to keep things as simple as possible and I depend a lot on the science of the washes to provide the main shading with only a basic highlight of the original colour. Also its a handy future reference for my future pike blocks I have found quite often that I come back to a project and think "how did I do these last time!?". Using a white undercoat was something I had not done since I first started painting in the mid to late 90's. I have become a fan of the Army painter spray paints an basically use the methods from their painting guides the main being undercoating in the dominant or main colour.
Base/undercoat: Army Painter white spray paint
Base colours
Flesh: GW Tallarn Flesh
Tunics: GW Enchanted Blue (thinned down a bit over the white gave them a bit of shading also)
Straps, scabard & sarissa: dark brown
Helmet & greaves: VJ Brass
Sandles: mid/light brown
Washes:
Linothorax: watered down GW Mud wash over the white undercoat
Everywhere else: GW Mud wash
Highlights
Face: GW Elf Flesh
Tunics: GW Enchanted Blue
Straps & scabards: GW Vermin Brown
Sarissa: GW Snakebite Leather in thin varied length lines
Helmet & greaves: VJ Old Gold
Sarissa and Shield
Tip and butt: Black basecoat, GW Chainmail for tip and VJ Brass for butt
Back of push pin shield: GW Vermin Brown

Base colours
Flesh: GW Tallarn Flesh
Tunics: GW Enchanted Blue (thinned down a bit over the white gave them a bit of shading also)
Straps, scabard & sarissa: dark brown
Helmet & greaves: VJ Brass
Sandles: mid/light brown
Washes:
Linothorax: watered down GW Mud wash over the white undercoat
Everywhere else: GW Mud wash
Highlights
Face: GW Elf Flesh
Tunics: GW Enchanted Blue
Straps & scabards: GW Vermin Brown
Sarissa: GW Snakebite Leather in thin varied length lines
Helmet & greaves: VJ Old Gold
Sarissa and Shield
Tip and butt: Black basecoat, GW Chainmail for tip and VJ Brass for butt
Back of push pin shield: GW Vermin Brown

Friday, 23 June 2017
Hat and Newline Designs comparison pics
A few older comparisons I did a few years ago and posted on the "1/72 Ancients" yahoo group:



Wednesday, 2 November 2016
Painting Samnite Infantry
Roughly how I painted Italian Allied Legionaries:
- Base coat with GW Tallern Flesh.
- Paint tunics various colours.
- Paint armour, helmets, standard with VJ Brass.
- Paint spear shafts Bronzed Flesh.
- Paint Feathers black.
- Paint leader's cloak with dark grey.

- Apply GW Delvan Mud Wash.
- Highlight skin with GW Tallern Flesh (face with GW Elf Flesh).
- Highlight tunics with original colours.
- Highlight armour, helmet and standard with VJ Old Gold.
- Apply GW Flesh Wash to spear shafts.
- Dry brush leader's cloak light grey.
- Base coat spear tips and swords black, paint with GW Chainmail.
- Shields, base coat GW Deneb Stone/Bleached Bone/Space Wolves Grey, GW Mud Wash, highlight original colour.
- Shield boss base coat with GW Boltgun Metal, highlight GW Mithril Silver.

Monday, 26 September 2016
Painting Ancient Italian Cavalry
This guide is going to be very simple and mainly to remind me of the general steps I took for Italian Allied Cavalry.


- Undercoat horse and rider with black.
- Base coat rider with GW Tallern Flesh.
- Base coat horses in various colours.
- Paint rider's tunics and flag various colours.
- Paint Armour VJ Brass.
- Paint reigns, straps spearshafts dark brown.
- Paint Feathers black.
- Paint leader's cloak with dark grey.

- Apply GW Delvan Mud Wash over horse and rider.

- Highlight horses in original base colours (black with GW Granite).
- Dry brush horses' mane and tail with original base colour.
- Highlight rider's skin with GW Tallern Flesh (face with GW Elf Flesh).
- Highlight rider's tunic and flag with original colour.
- Highlight armour with VJ Old Gold.
- Highlight reigns, straps and spear shafts with light browns.
- Dry brush leader's cloak light grey.
- Base coat spear tips black, paint with GW Chainmail.
- Metal shields as above, apply transfer, gloss varnish.
- Other shields, base coat GW Deneb Stone, GW Mud Wash, highlight original colour.
- Shield boss base coat with GW Boltgun Metal, highlight GW Mithril Silver.

Subscribe to:
Posts (Atom)