I had fell out of the habit of writing down my method of painting but as it will become clear below its useful having a recipe book. Mainly in my case I got mixed up with the order of steps so when I paint more in the future I can finally learn from my mistakes. If it is helpful to anyone else out there then that's even better.
My basic goal is to paint units, lots of figures at once, so I aim for a balance between quantity and quality. With that in mind I essentially use an 'Army Painter' method of basecoat wash and little bit of highlighting if neccessary.
I undercoated these with artists acrylic guesso procured from the Works, if I was starting a whole unit I might have used a Army Painter Barbarian Flesh. The guesso however provides a great key for paint to be applied.
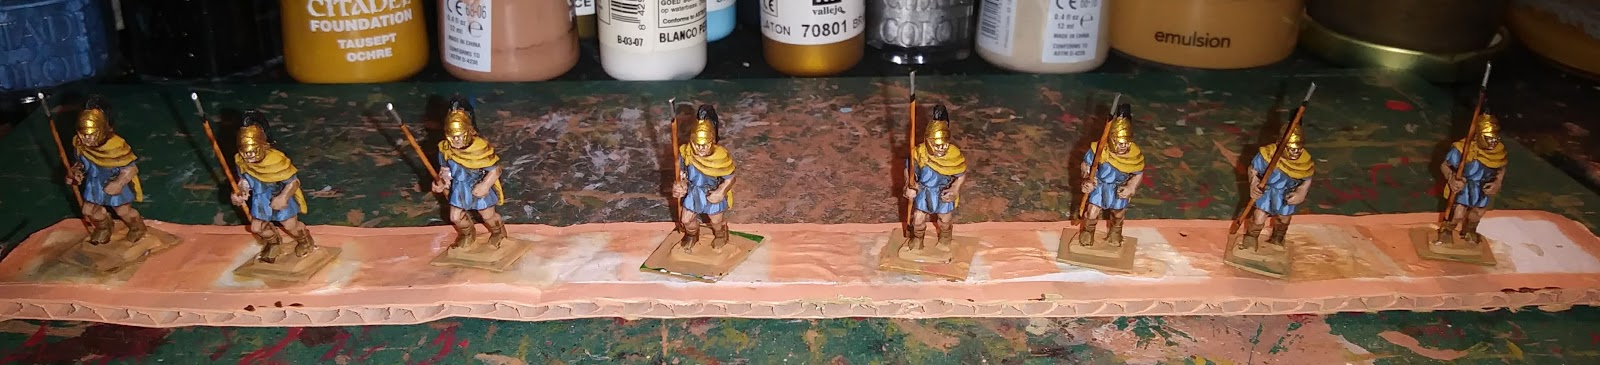
I usually try to start with the deepest parts of the miniature. I Started with their cloaks because from the front the cloak is in the nooks and crannies using Games Workshop Citadel (GW) foundation Tausept Ochre.
GW Tallarn Flesh for the skin including the face and helmet. I have found that this paint provides a nice base to paint Vallejo (VJ) Metallic brass. Once done I went over the boots with GW Graveyard Earth. Newer sculpts of this code have facial hair which were painted GW Scorched Brown.
Then the tunics, however in retrospect, I would do this step BEFORE painting the flesh. I think this is how I originally painted them years ago. It would have made the process easier.
One unit was based with GW Shadow Grey and the other with GW Scorched Brown then a stripe was painted down the front using GW Deneb Stone.
I left the straps, the shield will cover them up and the Scorched Brown base is a suitable colour for the rest. I used the brown to also paint the beards which the newer of the sculpts appear to sport.


The helmet was painted next with Vallejo Brass, the plume black and spear GW Vomit Brown. The spear is washed with GW Ogryn Flesh wash. A final inspection and cleanup of any mistakes.
GW Delvan mud wash was then applied shading the figures in a quick and easy manner. It also helps I find to hide slight mistakes and wobbly painting between different coloured areas such as the cloak and tunic.
Following the wash highlighting begins. Starting with the nose, cheeks and chin with GW Elf flesh. Beards were highlighted with a lighter Brown. Then the helmet is highlighted with Vj Old Gold.
Tunics highlighting is next. The brown tunics were first highlighted with GW Beastial Brown and further highlight with GW Vermin Brown. The stripe painted GW Deneb Stone followed by VJ Off White.
The grey blue tunics were given GW Shadow Grey and a further highlight of the same colour lightened with a touch of VJ Off White.
Both then had their cloaks highlighted in the original colour, GW Tausept Ochre. Spear tips were painted in GW Chainmail and the butts VJ Brass. The main body if the figures were finished off with the base painted with some OOP (like most of my paints) wilkos tester pot coffee paint.
Next up is their shields. The backs if them were undercoated with gesso followed by a GW Deneb Stone base coat.
The shields were then glued to the figures and the same process are applied to the fronts. The shield fronts is then dry brushed VJ Off White. The boss is painted VJ Bronze with a VJ Brass highlight. After that they are ready for the basing room!
As a final note I again was happy with the guesso undercoat. It made the basecoating process quite easy. I had to water down the paint a bit, aided by my new wet palette, as the guesso appears to absorb the paint nicely. So unless there is a major benefit to spray under/base coat I will stick with the guesso. The crisp detail of the Newline Design figures work very well with a basecoat, wash & highlight Army painter inspired method.